Tractor Stool Rides High

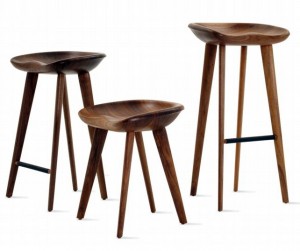
Tractor Stool from Desing Within ReachNew to the Design Within Reach catalog is the Tractor Stool Collection made from top-grade American walnut and inspired by old-timey tractor seats.

I love the mixture of straight lines and subtle curved seat carved out of a block of black walnut. The finish looks supremely natural and will likely age very well. In the two taller versions the footrest is covered in black leather.

I am tempted to give this type of wood shaping a try in my workshop, but it looks like alot of work to get the seat curved in the right places. And the pressure to get it right would be significant because you know a block of nice wood like that would not be cheap.

As much as I love these, I will not be buying them for my home. The price is $1130 for the short one and it goes up as the stool gets taller. Best I can do is maybe to try it for myself with a lesser species of wood.
Built-in Bathroom Shelves

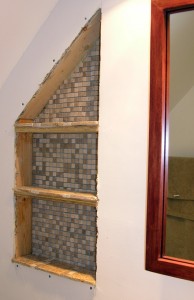
Unfinished built-in shelves

In a small bathroom space is at a premium. Recently I replaced a vanity and counter-top  that ran the length of a bath with a European-style, shallow-profile vanity. At that time, a new light fixture and a re-framed medicine chest were added.

While those improvements were needed, the reduction in counter and under-sink storage space were a problem. So, built-in shelves were next.

Finding the studs was the first step. A standard stud-finder worked like a charm and from there I could measure out the 16″ centers and start taking out the drywall within the selected space. (interior space between studs is normally 14.5″ unless you have an unpredictable old home or a nutty contractor built the wall)

Once the drywall was punched out using a flat-head screwdriver and a hammer (most efficient way I have found), a couple shelves of 3/4″ plywood were cut and  inserted. Friction plus some wood glue made for a good tight and permanent fit.

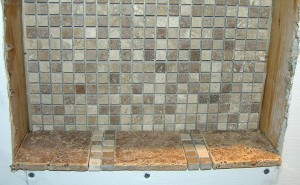
Built-in shelves, close-up

I used some left-over 4 x4 stone tile ($5/sq ft) for the main part of the shelf tops and some smaller squared sheets ($10/sq ft) for shelf accents and  the back of the shelves. After tan grout is worked into the cracks the shelf under sides and frame will be completed with poplar stained to match the mirror frame.

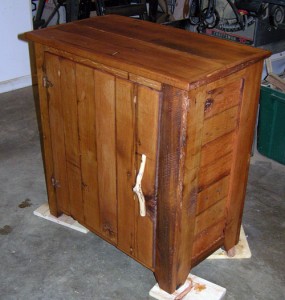
Cabinet- It is finished!

cabinet-finished-1Delivery tomorrow to the showhouse. Finish was still a bit tacky, but by morning it should be fine. I applied a coat of paste wax over the satin polyurethane to dull the finish even more. No time to add much in the way of peeled wood accents, but did add a natural twig handle. Hinges are rusty iron and there is a hidden door catch. I am pleased and hope the interior designer will be too.

Cabinet in Progress

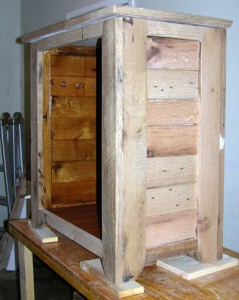
Cabinet with interior finishWith the deadline looming, I have been working like crazy on the cabinet for the Birmingham Symphony Decorator Showhouse. This weekend I got everything assembled except the door. I even started to put on the finish before I remembered to take more pictures. I had already applied stain (Olde Maple) to the interior of the cabinet in this picture.
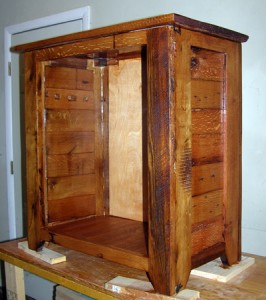
At first I wasn’t too sure about the final result, but after covering the entire piece with one coat, I am very pleased. The finish looks very natural but has an aged feeling to it that compliments the origin (barn timbers) and rustic character of the raw wood. I have not decided about a second coat. I am leaning toward a coat of paste wax.

What remains is to mount the door and, if possible, apply some fall peeled wood accents to the door. I had originally thought I would trim out the top with  the peeled wood, but it is very difficult to get straight cuts on naturally curved wood without a band saw. That may be my next purchase. Applying some accents may or may not work out. More on that later.
Cabinet with finish

The compound miter saw came in handy on this project and I finally laid to rest my Porter Cable orbital sander. It died after a very useful and productive life. I replaced it with a Black and Decker Palm Grip Sander after trying out the newer model of the Porter Cable  sander. Did not care for it and returned it the same day. The B&D is very nice and feels great in the hands due some gel inserts in the multiple handles. Bonus: It was also on sale for only $34. The PC model I returned was $59. Gotta love that.

Shell Robe Hanger

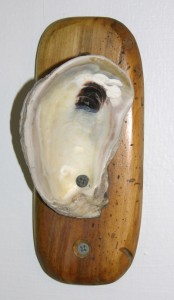
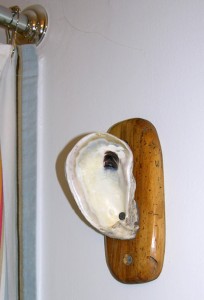
Shell HangerThis was a quick project that I finally finished. I had the oyster shell sitting around for a couple of years and had planned making this since I found it in my travels. The wood was a leftover from a king-size bed I built for a friend out of Indiana poplar.

I love that wood! It has so much character and interest, in its coloring,  the grain and from the insects that had a party there during storage.

Anyone could make this with limited tools. You would need a handsaw or scrap wood already the size you wanted  for the mounting plate, a drill, a shell, sandpaper, three screws, some epoxy, and wood finish.

The limiting steps in this are drilling the whole in the shell—I used a Dremel tool—but an electric drill and some patience will do the trick. The drill bit will get hot—pause periodically to let it cool.

Try to find a shell of sufficient length with a flattened edge that will sit flush against the mounting plate. You can sand this flat edge to make it more even. Depending on the shell, you may want to sand the edges a bit to take some of the sharpness down or get rid of barnacles. The shell is calcium carbonate—the smell may remind you of the dentist.

Shell HangerShaping the mounting plate took some patience too, but that is the beauty of woodworking.  Once it is shaped just like you like it, place the shell, measure and mark the spots for the two mounting screws and the through the shell screw. Drill pilot holes for the mounting and through screws and  countersinks for the mounting screws.

You can finish the mounting plate with about anything you want. Paint it if the wood is not all that interesting or use a stain or  a natural finish. I used some left over teak oil to penetrate the wood and then followed it up with a coat of paste wax applied with a steel wool pad. I think this is a supremely natural, but protective finish.

Make sure you choose a screw to mount the shell that is not so long it will stick out the other side of the mounting plate. Secure the shell with a small amount of epoxy, like JB Weld, and a wood screw.  Be careful not to over tighten and crack the shell. Let this dry overnight.

That is it. It is ready to mount wherever you choose. I used some self-drilling dry wall anchors . If you would like some measurements, let me know and I will post them. But really it is up to you. If you have more than one shell, you could mount them in a series on a wider piece of wood.